How to Automate the Moment Your Client Accepts the Proposal, All the Way Until the Deposit Invoice is Sent via Zapier
Imagine arriving at a prospect’s house to give an estimate…
…then leaving with a signed contract and deposit in hand.
If you are the type of painting contractor that delivers the estimate on the spot, the rest can be done seamlessly with Zapier!
In this 6-Step Automation, I’ll walk you through, step-by-step, how to automate the moment your client accepts the proposal, all the way until the deposit invoice is automatically sent.
To be more specific, when a proposal is accepted in Estimate Rocket or PEP Cloud, Zapier will automatically:
- Search for an existing Customer or create a new one from the info given in the proposal
- Create an Invoice for the Full Amount $ using the amount on the accepted proposal
- Multiply the full amount by your Deposit Percentage amount
- Create a second Invoice for the amount of the Deposit
- Send the Deposit Invoice to your customer
While I explain, if at any point you’re like:

Do the right thing and save your computer by emailing me to set it up for you instead: Nadia@DYBVirtual.com
But for those of you automation machines out there -this is one of my absolute FAVORITES!
Before I begin, for those who aren’t too familiar with Zapier or want to check out some other automations we recommend, click here.
Here’s what you’ll need to create this automation:
- Zapier “Starter” Account -this gives us the ability to create a multi-step zap, as well as use Zapier’s “formatter” tool, and integrate with Quickbooks Online.

2. a Trigger Application -for example, Estimate Rocket or PEP Cloud


3. a Quickbooks Online Account **Quickbooks Desktop is NOT integratable with Zapier… sorry!

A few things to think about concerning Quickbooks Online beforehand are:
- What are your “terms“? (Net 60, Net 30, Net 15, Due on Receipt)
- Do you accept ACH Bank Transfer as a form of payment?
- Do you accept Credit Card as a form of payment?
- What message do you want to display on the Invoice?
- Deposit amount/percentage
Once you have all of this information, there are two ways we can begin, depending on your trigger:
Step 1: How to Set-up the Zap Using PEP Cloud
- Login to your PEP Cloud account
- Once logged in, click here to connect Zapier
- If successful, this should’ve opened up a new tab in your browser with “PEP Cloud” as the trigger, titled “My First Zap with PEP Cloud“:
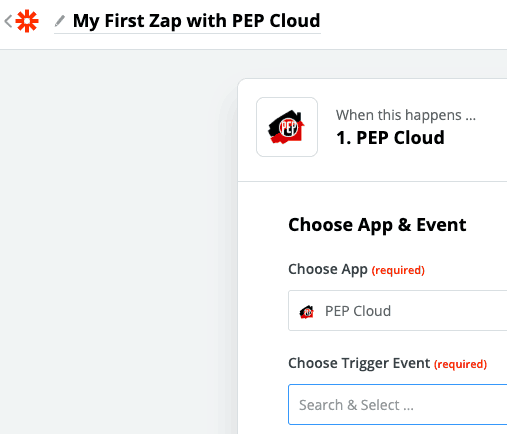
4. Next, select the drop-down menu under “Choose Trigger Event” and select “eBid Won“

5. Continue
5. Select the drop-down menu under “Choose Account” and select your account
6. Continue
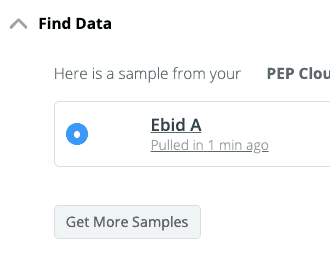
7. Now, we need to pull-in sample data from your account, select “Test & Continue” -if you have a brand new account or just hooked up PEP to Zapier it may not pull in anything. Go into your PEP account and create a test bid and accept it. Once this is done, go back to Zapier and select “Get More Samples“.
8. Once you have a sample, if set-up correctly you’ll see a green checkmark icon at the top:

Step 2: Search for an Existing Customer or Create a New Customer in Quickbooks Online
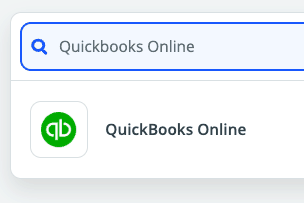
9. Select the blue plus button to add the first action

10. Search for and select “Quickbooks Online“
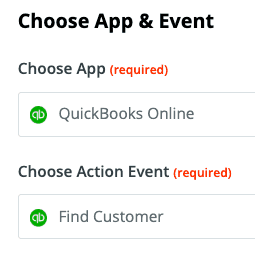
11. Select the drop-down menu under “Choose Action Event” and select “Find Customer“
12. Continue
13. Select the drop-down menu under “Quickbooks Online Account” and select your account
14. Continue
15. Select the drop-down menu under “Search Field“
Here you have two options. You can either have Zapier search Quickbooks for the corresponding customer by their “Name” or by their “Email“
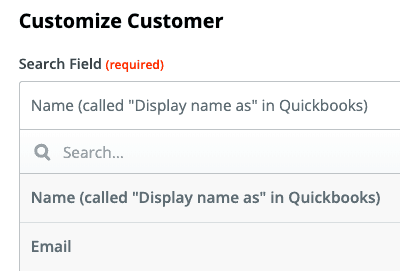
It depends on how you have your system setup already, however, I recommend searching by email.
16. Once you’ve chosen how you want to search for the customer, select the menu button with a “+” icon to the right of the “Search Value” box:
17. Select “Client Email“

18. Below the Search Value field, check the box “Create QuickBooks Online Customer if it doesn’t exist yet?“

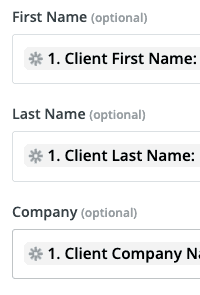
19. Under “Full Name” select the menu “+” button
20. Select “Client First Name” press the [Space Bar] and then select “Client Last Name“

21. Do the same for “Display Name“
22. Under “First Name” select the menu “+” button, select “Client First Name“
23. Under “Last Name” select the menu “+” button, select “Client Last Name“
24. Under “Company” select the menu “+” button, select “Client Company Name“
(Setting up the customer is pretty self-explanatory)
25. Once you’re done filling out the customer info, select “Continue“
26. Select “Test & Review“

27. If the Quickbooks client didn’t already exist (Zapier will tell you if it did or didn’t), check Quickbooks to confirm the customer was created
Step 3: Creating the Invoice for the Full Amount in Quickbooks Online
28. Select the blue plus button again
29. Search for and select Quickbooks Online
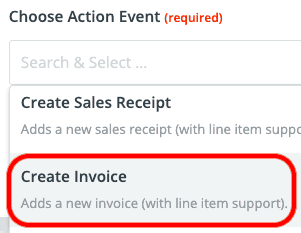
30. Select the drop-down menu under “Choose Action Event“
31. Select “Create Invoice“
32. Select “Continue“
33. Select the drop down under “Quickbooks Online Account” and select your account
34. Select “Continue“
35. Under “Customer” select the drop-down arrow
36. Select “Use a Custom Value (advanced)“
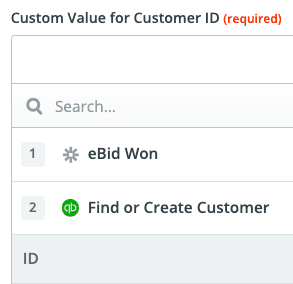
37. a new field will appear: “Custom Value for Customer ID“, select the menu plus button
38. to the right of the “Find or Create Customer” row, select the drop-down arrow
39. Select “ID“
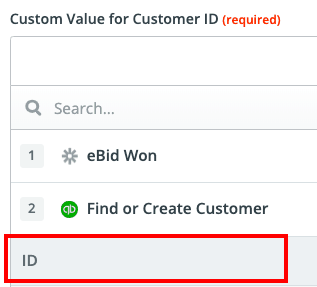
Doing this will pull the info of the customer from previous step
40. In the Email field, select teh drop-down menu like last time but this time select “Primary Email Addr Address“
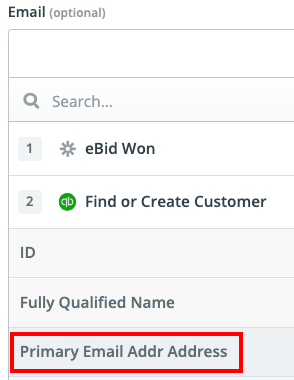
In the following two fields, you have the option of adding any emails as “cc” or “bcc”
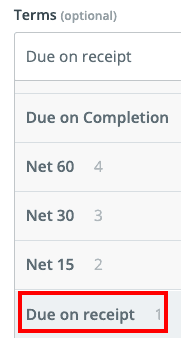
41. For the billing address, if the customer already has an address you don’t have to add it again
42. Select your Terms
43. For “Invoice Date” it is automatically defaulted to “today’s date”
44. Skip down to “Invoice Number” and type in “AUTO_GENERATE“
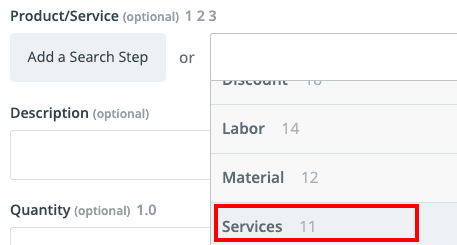
45. Under “Product/Service” select the drop-down menu then select a service to be your default for all of the invoices
NOTE: This is the full amount invoice which will NOT be automatically sent so you can adjust it before sending it later on.
A default may be something like “Services” or “Painting” -it doesn’t really matter since you’re able to adjust it.
OR if you’re an automation machine, we could use the conditional logic, or “Paths” function by Zapier to segment up to 3 different types of invoices based on the job type from the eBid.
But that’s for another time…
46. Under “Description” input the information you normally use, whether it’s a combination of “Job Type“, “Job Name“, “Job Number“, and/or “Job Site Address” and you can even throw in some text if you want.
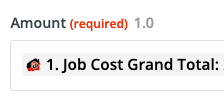
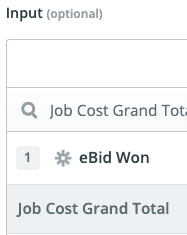
47. Scroll down to “Amount” and use the “Job Cost Grand Total“
48. Next, go down to “Message Displayed on Invoice” and type in a little message.
Example:
Hi [Client First Name],
On behalf of the whole [Your company name] team, we want to thank you for choosing us to serve your painting needs!
The job has been successfully completed and we hope it is everything you hoped for.
Attached is the final invoice and we appreciate your prompt payment.
Have a great rest of your week,
[Your Company Name]
49. Scroll down to “Accept Payment via Bank Transfer” and select Yes or No

50. Do the same for “Accept Payment via Credit Card“
51. Scroll down to “Continue“
52. Select “Test & Review“
53. Login to your Quickbooks Online account check to confirm that the invoice turned out the way you want it to, then go back and make any adjustments
Step 4: Creating the Deposit Amount Using the Zapier Formatter
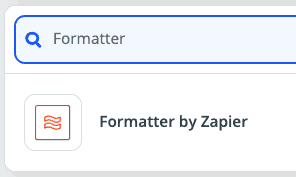
54. Go back to Zapier and select the plus button
55. In the search box, type in “Formatter” and select “Formatter by Zapier“
Here’s where we make Zapier do our math homework…
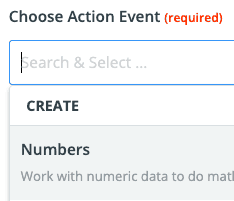
56. Select the drop-down menu under “Choose Action Event” and select “Numbers“
57. Select Continue
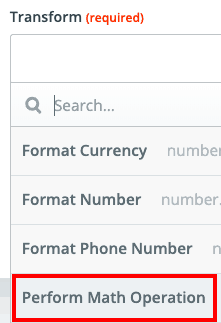
58. Select the drop-down under “Transform“, then select “Perform Math Operation“
59. Select Continue
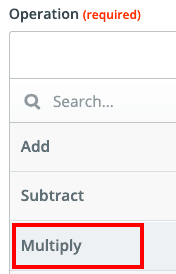
60. Under “Operation” select “Multiply“
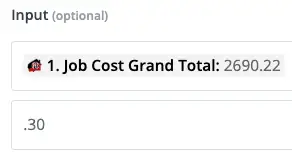
61. Under “Input” select the drop-down menu and type in “Job Cost Grand Total” and select it
62. Select the Plus button to the right

63. Type in your deposit percentage in decimal form
Example for deposit amount of “30%”:
64. Select Continue
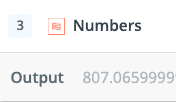
65. Select Test & Review
If input successfully, you should see a screen like this:
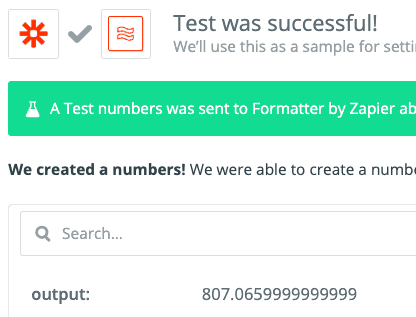
Here, the “Output” is the deposit amount!

If your not too sure that the calculated deposit amount is correct, do the math on your phone to double-check.
Step 5: Creating the Invoice for the Deposit Amount in Quickbooks Online
These next steps for setting up the second invoice for the deposit amount will almost be the same as setting up the full amount invoice.
66. Again, select the Plus button
67. Type in and select Quickbooks Online
68. Under “Choose Action Event” select “Create Invoice” then Continue
69. Select Continue then choose your Quickbooks Online Account
70. Under Customer scroll to the bottom and select “Use Custom Value (advanced)
A new field will appear, “Custom Value for Customer ID“
71. Select the drop-down menu and choose “ID” under the step 2 for “Find or Create Customer“
72. Choose the primary email
73. Cc or Bcc yourself or anyone else.
74. The billing address can be left blank because the customer’s address will be used by default
75. Under terms select “Due on Receipt“
76. Scroll down to Invoice Number and select the drop-down menu, then type in “AUTO_GENERATE“
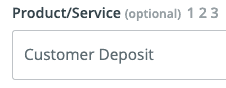
77. Under Product/Service select Deposit
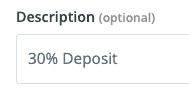
78. Under Description, type in your deposit percentage
79. Scroll down to Amount and select the drop-down
80. Type in “Output” then scroll down under step 4 Number select the Output (deposit amount)
81. Under Message Displayed on Invoice, type in a custom message
Example:
Hi [First Name],
Thank you for choosing us at [Your company name] to help you with your painting needs.
Attached is your deposit invoice, which is 30% of the agreed-upon amount, so that we can put your project on our schedule as quickly as possible.
If you have any questions please call [phone number] and we’ll be happy to help.
Have a great rest of your week,
[Your Company Name]
82. Select whether or not you accept bank transfer and/or credit card
83. Select Continue
84. Select Test & Review
85. Login to Quickbooks Online to confirm the Deposit Invoice turned out as. expected, or go back and adjust as needed
Step 6: Sending the Deposit Invoice
Of course the point of doing all of this is to be able to arrive at the appointment, present the estimate on the spot, get the proposal signed, and leave with the deposit.
BUT, if for whatever reason more info or time is needed to put together the proposal, we’ve added this step to the automation.
86. Select the blue plus button
87. Select Quickbooks Online
88. Under “Choose Action Event” select “Send invoice“
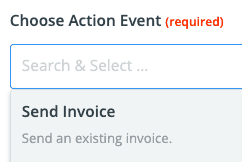
89. Continue
90. Select the drop-down menu and select “Use a Custom Value“
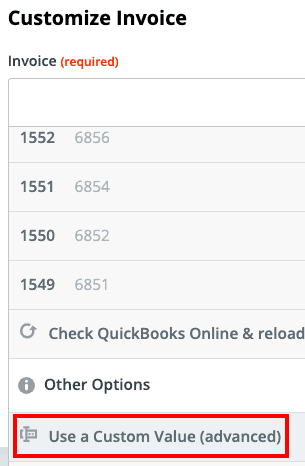
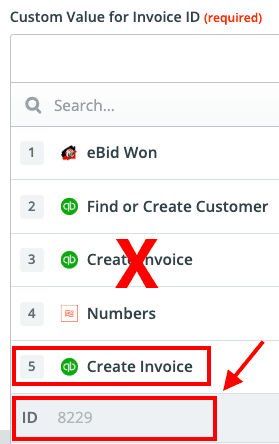
91. Under “Custom Value for Invoice ID” select the menu plus button, then under “5 Create Invoice” select “ID”
**IMPORTANT: Make sure you are NOT selecting the first invoice under “3” because that will send the full amount invoice**
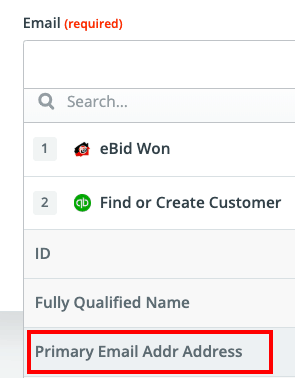
92. Under Email select “Primary Email Addr Address“
93. Select Continue
**IMPORTANT: If you run a test, be sure that you are the test customer, so that a random customer from your Quickbooks account is not getting this email
Lastly, turn your zap ON!

so there you have it…
When you arrive at the estimate and present the estimate on the spot, as soon as the proposal is accepted, within 15 minutes, Zapier will automatically create the customer in Quickbooks Online, Create the Invoice for the full amount, create the invoice for the deposit amount, and then send the deposit invoice!
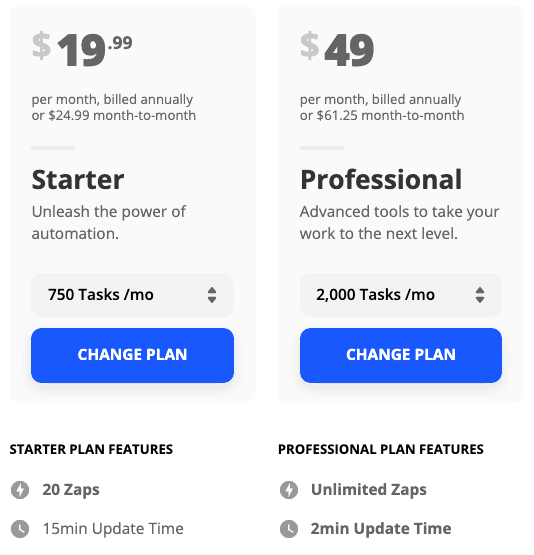
NOTE: If 15 minutes is too long of a wait, you can upgrade the Zapier account plan to “Professional” which will run the zap within 2 Minutes instead of 15.
I hope this walkthrough of setting up your Quickbooks to PEP zap helps!
The Estimate Rocket walkthrough involves a few more steps than this since it doesn’t offer a “Proposal Accepted” trigger in Zapier -which we’ll need to manually create using the Parser tool. (COMING SOON).
Again, if you’re ready to pull your hair out by now, I can set it up for you if you shoot me an email at Nadia@DYBVirtual.com
If you’re interested in checking out how else you can save hours of time each week by utilizing zapier automations for painting contractors, click here to learn more or book a free Zapier consultation with Nadia below.